


Table of Contents
- Why Oil Sprayer Maintenance Matters
- Signs Your Oil Sprayer Needs Attention
- Step-by-Step Oil Sprayer Cleaning Process
- How to Unclog an Oil Sprayer Nozzle
- Oil Sprayer Cleaning Frequency: How Often Is Enough?
- Best Oil for Kitchen Sprayers: What to Use and Avoid
- Long-Term Storage and Preventative Maintenance
- Frequently Asked Questions
Last Updated: September 17, 2026
Why Oil Sprayer Maintenance Matters
A 60-day product test found that a well-maintained oil sprayer cuts cooking oil use by 70-85% compared to pouring straight from the bottle, according to Love Great Finds' [olive oil sprayer(/products/kitchenmaster-16oz-dual-function-olive-oil-sprayer-and-dispenser-black) review | lovegreatfinds.com]. That saving only holds while the pump and nozzle work properly. Learning how to maintain your kitchen oil sprayer is what keeps that number from collapsing after a few months of daily cooking.
Signs Your Oil Sprayer Needs Attention
The clearest sign is a spray pattern that turns uneven, weak, or concentrated in one spot instead of a wide-angle mist. A healthy sprayer delivers a fine, even coating when you press quickly and a steady stream when you press slowly.
Watch for these warning signs:
- Sputtering instead of misting, oil comes out in droplets or a thin jet
- Weak pump pressure, the trigger feels soft or requires multiple pumps
- Visible residue around the nozzle tip or under the collar
- Oil leaking past the gasket or seal
- A rancid or stale smell from oil sitting too long inside the bottle
Step-by-Step Oil Sprayer Cleaning Process
A full cleaning takes about 10 minutes with supplies you already own. Most sprayers need this every two to four weeks, depending on how often you cook. The steps below are the same for every sprayer, but the water temperature and soak time change with the body material, get that wrong and you can warp a seal or cloud a plastic reservoir.
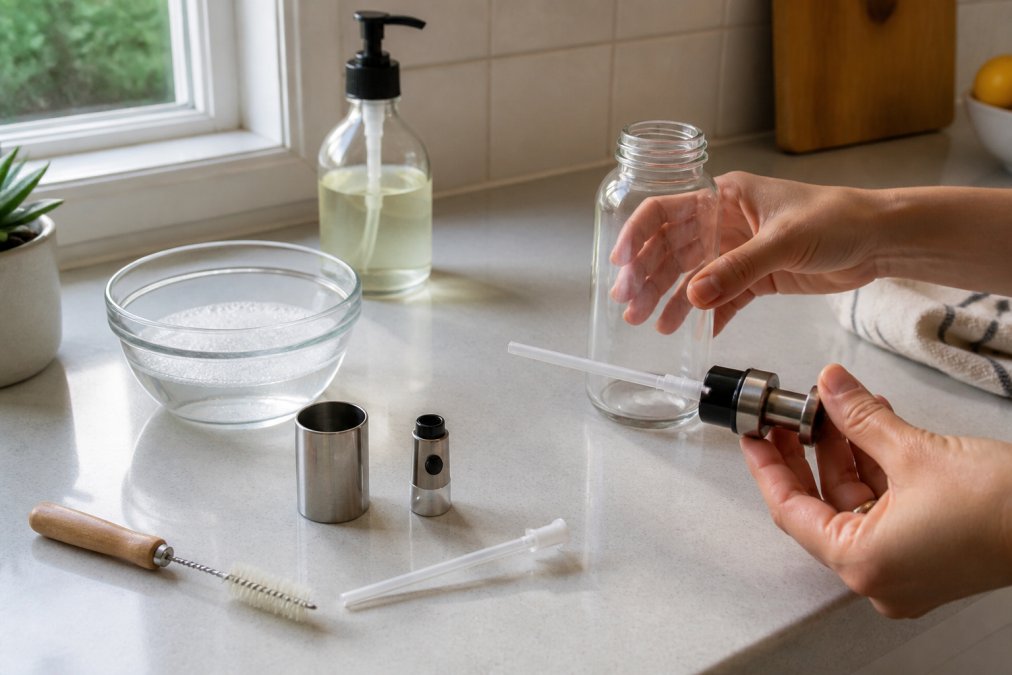
Disassembling the Sprayer Components
- Empty any remaining oil into a separate container.
- Twist off the pump head from the bottle body.
- Remove the nozzle cap, then pull the pickup tube free from the pump base.
- Set the bottle body aside and sort the small parts, nozzle cap, pickup tube, gasket, spring, into a shallow dish so nothing rolls into the disposal.
A common mistake is forcing the nozzle cap when it sticks. Twist gently; residue often bonds the threads. If it will not budge, wrap the cap in a rubber band for grip before trying again.
Matching the Wash to the Body Material
Most sprayer bodies are one of three materials, and each one reacts differently to heat and to acidic cleaners:
| Body material | Water temperature | Safe soak | Avoid |
|---|---|---|---|
| Glass | Warm, up to about 120°F | White vinegar, baking soda, mild dish soap | Sudden temperature swings, thermal shock can crack the glass |
| Stainless steel | Warm to hot | White vinegar, baking soda, mild dish soap | Chlorine bleach, which pits the surface over time |
| BPA-free plastic | Lukewarm only, under about 110°F | Mild dish soap, short vinegar rinse | Hot water, long vinegar soaks, and dishwasher cycles, all can cloud the plastic or distort the threads |
Drying and Reassembly Tips
Rinse every part under warm running water, then wash with mild soap and a soft brush. For stubborn film, soak the nozzle in white vinegar for 15 minutes, but only if the nozzle is not the soft plastic type that clouds, in which case use a baking-soda paste instead.
A Note on the Gasket and Seal
The rubber or silicone gasket is the part most people never clean and the first to fail. Wipe it with a soapy cloth, rinse, and let it dry flat rather than stretched. If it feels stiff, tacky, or has visible cracks, replace it, a worn gasket is the usual cause of oil leaking past the collar even after a thorough clean.
How to Unclog an Oil Sprayer Nozzle
Soak the nozzle in warm water with a spoonful of baking soda, then flush it with a vinegar soak if the clog persists. Most blockages are hardened oil residue, not a broken pump.
Follow this sequence:
- Remove the nozzle cap from the pump head.
- Soak it in warm water mixed with baking soda for 20 minutes.
- Rinse, then soak in white vinegar for another 15 minutes if residue remains.
- Use a toothpick to gently clear the tiny spray hole. Never use a pin or needle; you'll widen the opening and ruin the spray pattern.
- Flush with warm water and air dry before reinstalling.
Oil Sprayer Cleaning Frequency: How Often Is Enough?
Clean your oil sprayer every two to four weeks with daily use, and do a deeper soak monthly. If you use it only occasionally, clean it before each refill instead.
Frequency depends on three factors:
| Usage Pattern | Light Clean | Deep Soak |
|---|---|---|
| Daily cooking | Every 2 weeks | Monthly |
| A few times per week | Monthly | Every 2-3 months |
| Occasional use | Before each refill | Twice a year |
Best Oil for Kitchen Sprayers: What to Use and Avoid
Extra virgin olive oil works well in a sprayer, but only if you clean regularly and store it away from heat. The best oil for kitchen sprayers is any fresh, unrefined oil you'll use within a few weeks.
What to avoid:
- Thick, unrefined oils like unprocessed coconut oil, which solidify and clog nozzles
- Oil with added flavorings or solids that settle and block the pickup tube
- Old or reused oil that has already started oxidizing
Why Old Oil Residue Ruins the Next Batch
Oxidation is the overlooked problem, and it works on two levels. First, oil exposed to air and light breaks down, turning rancid and leaving sticky residue inside the pump. Second, and less obvious, that residue flavors everything you spray after it. A thin film of rancid oil left in the pickup tube will taint a fresh fill within days, so a sprayer that smells off is usually telling you about the last batch, not the current one.
Diagnostic Table: Match the Symptom to the Cause
Before you blame the oil, use this table to narrow down what is actually wrong. Most sprayer problems fall into one of these patterns.
| Symptom | Most likely cause | First fix |
|---|---|---|
| Fine mist turns to a thin jet or squirt | Partially clogged nozzle hole | Soak the nozzle cap in white vinegar, then clear the hole with a toothpick |
| No spray at all, trigger feels firm | Fully blocked nozzle or pickup tube | Soak both parts, then flush with warm water |
| Weak, sputtering spray | Air in the pump or a loose pickup tube | Reseat the tube, then pump a few times to prime |
| Oil leaks past the collar | Worn or misseated gasket | Clean and reseat the gasket, or replace it |
| Spray smells stale or rancid | Oxidized oil residue in the pump | Full disassembly and deep clean, then refill with fresh oil |
| Spray pattern drifts to one side | Bent or widened nozzle opening | Replace the nozzle cap, do not try to reshape it |
Long-Term Storage and Preventative Maintenance
Clean and dry your sprayer completely before storing it for more than a month. Never store it with oil inside; that's how rancid residue sets into the pump mechanism.
Preventative habits that extend lifespan:
- Refill with fresh oil rather than topping off old oil
- Keep the bottle out of direct sunlight
- Check the gasket and seal for cracks every few months
- Lubricate the pump plunger with a drop of fresh oil if it stiffens
- Rinse the nozzle after each refill
Frequently Asked Questions
Can you put vinegar in an oil sprayer?
Yes, diluted white vinegar is a safe and effective cleaning agent for oil sprayers. Mix equal parts vinegar and warm water, then spray the solution through the nozzle to break down oil residue. Let it sit for a few minutes before rinsing thoroughly with warm water. Vinegar also helps sanitize the pump mechanism and gasket. Avoid leaving undiluted vinegar in glass or metal components for extended periods, as it can cause corrosion over time.
How to clean an oil sprayer nozzle?
Remove the nozzle from the sprayer and soak it in warm water with a few drops of mild soap for 10 to 15 minutes. Use a small brush or pin to gently clear any residue from the tiny openings. For stubborn blockages, soak the nozzle in a baking soda and water paste for 20 minutes. Rinse with warm water and let it air dry completely before reattaching. Wiping the nozzle after every use prevents buildup and keeps the spray pattern consistent.
Do olive oil dispensers need to be cleaned?
Yes, olive oil dispensers require regular cleaning to prevent oil oxidation, rancidity, and clogged nozzles. Even though olive oil has natural preservative properties, exposure to air and light degrades it over time. A quick rinse every one to two weeks and a deep clean every four to six weeks keeps the dispenser working properly. The KitchenMaster 16oz Dual-Function Olive Oil Sprayer and Dispenser is designed with a glass body that resists oil spoilage and simplifies cleaning.
What is the best oil to use in a sprayer?
Light oils like extra virgin olive oil, avocado oil, and canola oil work best in kitchen sprayers because they have lower viscosity and flow smoothly through the pump mechanism. Avoid oils that solidify at room temperature, such as coconut oil or animal fats, as they clog nozzles quickly. The KitchenMaster sprayer dispenses approximately 0.15g of oil per spray, making it easy to control portions with any light cooking oil. Always check that your chosen oil stays liquid in your kitchen environment.
Maintaining an oil sprayer comes down to one habit: clean it before residue has a chance to harden. Skip that, and even a well-built sprayer will lose its mist within months. Lesara's Odds & Ends carries the KitchenMaster dual-function sprayer with a glass body, precise 0.15g dispensing, and lifetime support, so you get a tool designed to be cleaned and reused rather than thrown away. Add one to your cart and keep your cooking oil flowing exactly the way you want it.


